Last updated on November 30th, 2023 at 10:39 pm
*This post may contain affiliate links and we may earn a small commission if you click on them.
Learn to use Affinity Designer 2 for sewing patterns and projector sewing!
Do you want to make all your pattern adjustments digitally? Plan layouts for cutting fabric to conserve material? Then, Affinity Designer 2 is the perfect companion for projector sewing!
Learning a new program can be intimidating! Let me walk you through everything you need to know to get started using Affinity Designer 2 for sewing!
In this tutorial, I will be teaching you how to open patterns, use the basic tools, and learn about the studios.
Once you have mastered this tutorial you will be ready for pattern Tetris and even full bust adjustments on digital sewing patterns!
Open up Affinity Designer 2 on your computer and let’s jump in!
How to Open a Pattern in Affinity Designer 2
Opening a pattern in Affinity Designer is one of the first things you will need to know how to do. I prefer to save all my digital pattern files on Google Drive. You can link your Google Drive right to your desktop computer to access it.
Others may save all their patterns directly on their computer. (Remember to back up your files if this is you!)
You will need to be able to access your pattern files from the cloud or device that you will be using Affinity Designer on.
Go to File>Open or press CTRL+O to open a pattern file. Affinity Designer can read many file types including PDF, PNG, JPEG, and SVG.
Pattern files that you will open using Affinity Designer are Projector File PDFs or A0 copy shop size pattern files.
Do not open multi-page patterns or instructions. If you need to convert a “print-at-home letter-sized pattern file to a single-page pattern for projecting, use PDF stitcher. There is a full tutorial on how to convert multi-page patterns to projector files using PDF Stitcher.
When you open a file a dialogue box will open. Choose “Load all pages” and “Replace missing fonts”.
Locked Files
Some patterns will not open in Affinity Designer. They may say the file is locked and ask for a password. Before sewing with a projector was a thing, many pattern companies would lock their PDF pattern files.
Since projector sewing has become a thing, most customers prefer unlocked files for easy access when using programs such as Inkscape and Affinity Designer.
A quick fix for a locked pattern is to just run the pattern through PDF Stitcher. Open the document in PDF Stitcher and select a “save as” name. Click “generate”, no need to mess with any of the other settings.
This will “unlock” the file and it should open in Affinity Designer!
Setting up document
The first time you open Affinity Designer, you will want to set up your document settings. The main item of business is to change the units to inches or centimeters, whichever is your preferred unit of measurement.
You can also change the size of the document if you’d like.
To access the document settings, go to File>Document Setup or use the shortcut CTRL+Shift+P.
Once the dialogue box is open, change the document units. You can also change to dimensions of the pattern by typing in the length and width. I like to “unlock” the ratio of the dimensions by clicking on the chain, but it’s a personal preference!
Keep in mind that Adobe will not open any document larger than 200×200 inches!
Make sure to select that the objects are anchored to the page. Then, click “okay”.
If you only need to change the units of measurement, you can do this quickly from the artboard. Right-click on the left corner where the units are displayed on the rulers. Select your desired units of measurement.

Affinity Designer Master Class
Learn to master Affinity Designer with the program that Sheredith from Projector Sewing started with!
“I highly recommend this course to anyone that is new to Affinity Designer! Although it is not sewing specific, this class is invaluable to getting started.” -Sheredith
This Logos By Nick master class contains 60+ explainer videos that go over every tool and feature of Affinity Designer.
Get lifetime access for only $17!
How to Add rulers and Guides
Are you missing rulers or guides? Let’s add them!
To show rulers on the top and left of the screen go to View>show rulers or use the shortcut CTRL+R.
Sometimes when we are doing pattern alterations, it is nice to have a grid on the pattern. To show the grid in your chosen units, go to View>show grid or use the shortcut CTRL+’.
Navigating with your Mouse
Navigating the screen using your mouse is intuitive once you know a few tricks! Open up Affinity Designer and give these a try!
Press the mouse wheel and move the mouse to pan around the document.
Ctrl+mouse wheel to scroll in and out.
Short Cuts to Take Note of
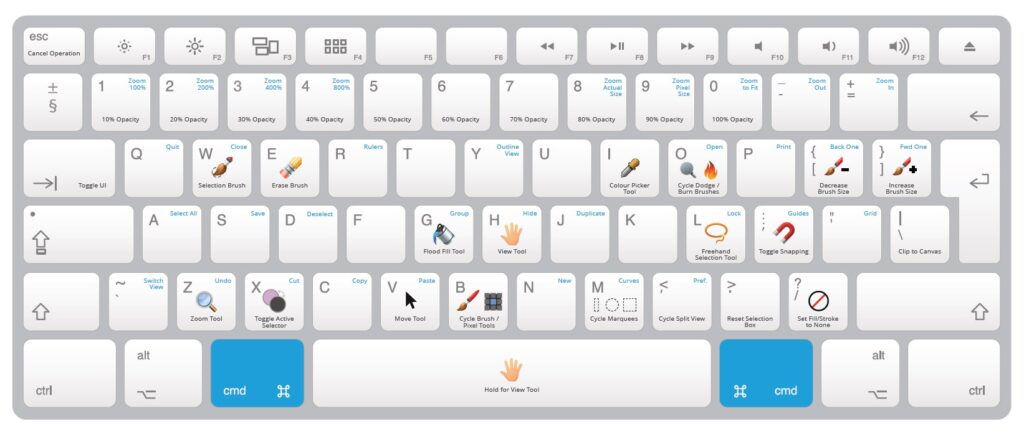
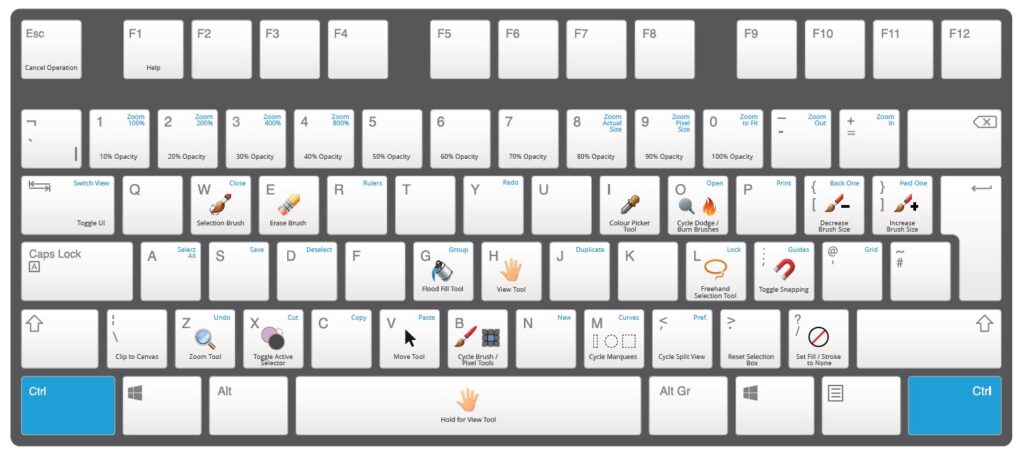
Many shortcuts save time! Open up Affinity Designer and try a few of these shortcut keys for yourself! They are sure to come in handy when you are making pattern alterations or projecting a pattern.
*Mac Users: Use Command instead of Control.
Tab: Full Screen Mode
Hide Top Toolbar: CTRL+ALT+T
Hide Right Studio: Shift +H
Document Setup CTRL+Shift+P
Save CTRL+S
Undo CTRL+Z
New Document CTRL+N
Duplicate CTRL+J
Group CTRL+G
Ungroup CTRL+Shift+G
View>Dock Tool will allow tools to be docked on left or float on the artboard
View>Show tools will remove tools from the left of the screen
Move tool (V)
Node Tool (A)
Pen Tool (P)
Knife Tool (K)
Rectangle Tool (M)
Zoom Tool (Z)
Tools in Affinity Designer
I will go over most of the tools on the toolbar. I will focus on the tools that are most used for sewing and sewing alterations.
Move Tool
The first tool is the move tool, represented by the arrow. You will use the move tool frequently, so it is useful to get to know what it does!
The shortcut for the Move tool is (V).
Click and drag a box over an entire pattern piece to select all the components of the piece. The line must be completely in the selection box to be selected.
You can also click on an object to select a single line or grouped objects.
Press shift while moving the object to move in a straight line at 90 degrees and 45 degrees.
Turn snapping on to snap to shapes
Node Tool
The Node tool is one of the main tools you will use when making pattern alternations. The nodes control the lines and curves of the pattern.
Select the Node Tool by clicking on the toolbar or using the shortcut (A).
Click on the line to see the nodes.
There are three main types of nodes: sharp, smooth, and smart.
The sharp nodes are for corners and sharp angles and are represented by a square node.
Smooth nodes are for curves and smooth angles at the node. They are represented by a circle.
Smart nodes are smooth nodes that the computer program will determine the angle as you draw. These are typically only used when you are drawing your own lines. They are represented by a circle with a dot in the center.
You can click on any node, move it around, delete it, or convert it to a sharp or smooth node.
Pen Tool
The pen tool can be selected using the left toolbar or using the shortcut (P).
The pen tool is just like it sounds. It is used for drawing lines and shapes.
To draw a line, click on the canvas. Then click when you want to continue drawing the line. You can keep adding nodes anywhere you want and a line will connect them.
To finish a line, press the Esc key.
To make a curve click and drag the mouse.
To make a straight line click + right mouse or Click + Right mouse and drag.
Knife Tool
The Knife Tool is new to Affinity Designer 2. It is a pretty nifty tool for slicing and cutting lines. I have a quick tutorial on just the Knife Tool Here. The tutorial includes a demonstration of the “slash and spread” method using the knife tool.
To select the knife tool, click on the small knife icon on the left toolbar or use the shortcut (K).
To cut a shape, you must first select the lines or shapes that you will be cutting. You can click and drag over the entire shape or click on specific lines.
Make sure the entire pattern piece is selected if you want to cut through the entire piece.
Start cutting by clicking on the outside of the shape and dragging through the shape.
You can cut freehand or constrain it to a straight line by holding Shift. To draw a straight line in any direction, use Shift+Alt.
You can toggle using the node tool and knife tool by holding CTRL down.
Rectangle Tool
The rectangle tool can be a nifty tool, especially when you are making pattern pieces for cut charts or pattern Tetris. You can use the rectangle tool to click and drag to create a rectangle.
The transform box on the right toolbar is where you can input exact measurements. We will go over the transform box later in this tutorial.
Measure Tool
The measure tool is another tool that is new to Affinity Designer version 2! Finally, it allows you to accurately and quickly measure curves.
The measure tool is located on the left toolbar and looks like a ruler.
If you click on the small arrow on the icon, you will see there are two tools: the measure tool and the area tool.
The area tool is the tool that is used to measure curves.
The measure tool can measure any line. Click on a starting point, then measure to your ending point. The measurement will be displayed using the units that the document is set to.
The measurement does not stay once you click off the line.
To measure a curve, select the curve that you want to measure and make sure it is all in one piece. Then, click on the ruler. If you hover over the curve, the length will be shown.
Zoom Tool
The zoom tool is self-explanatory on what it does but has a few cool features. You will want to pay extra attention to the zoom tool if you plan to calibrate your projector in Affinity Designer.
You can choose zoom or view tool when you click the zoom tool icon. The view tool is a little hand that you can click and drag to move around the view of the artboard. You can also do this by pressing the scroll button on the mouse and moving the mouse.
The zoom tool is the magnifying glass. When you move over the artboard the magnifying glass will have a plus sign in it. Click on the artboard and it will zoom in. Hold ALT and click to zoom out. You can also zoom in and out by pressing CTRL and using the mouse scroll.
When the zoom tool is selected you will also see a toolbar appear at the top of the screen. Next to “zoom”, you will see the percentage zoom that the document is currently at. You can type in any amount of zoom. This is perfect for calibrating! It will zoom to decimal values, but only “shows” the rounded value.
You can save viewpoints using the Navigator studio explained in the section below.
Right Studio Panels
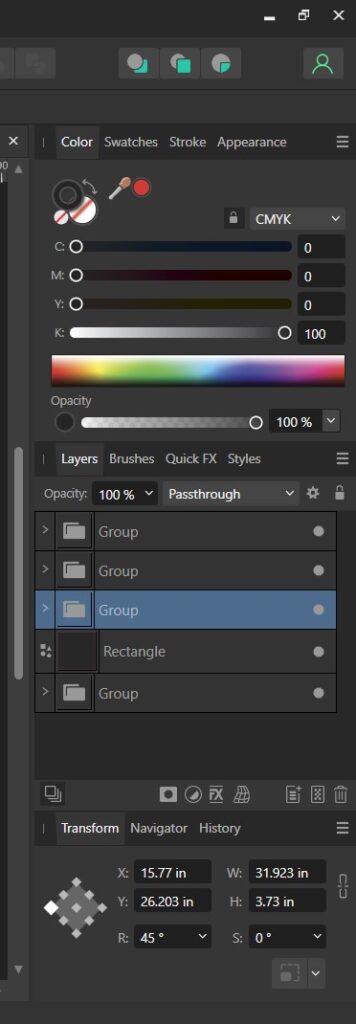
The right studio panels are very useful when working in Affinity Designer 2. The most common items you will use are the layers and transform panels. You can also easily make the right studio panels disappear or reappear by pressing Shift + H. If at any time you need to reset the Studio, go to Window>Studio>Reset Studio.
Color
The color studio is where you can change the fill color or outline color of the object. The fill color is the solid circle and the ring is the outline color. Click on the one you want then select the color you would like. This works great when you are making pattern adjustments or changing the pattern lines to a more visible color. Pattern lines can also be quickly changed using PDF Stitcher.
The color studio also allows you to change the opacity of the colors as well.
Swatches
The swatches studio is very similar to the colors. You can select a fill or outline color. However, it also allows you to create a color “Palette”. Not necessary for most sewing projects, but a nice feature.
Stroke
Have you ever wanted to have one size on a pattern a dashed line and another size a solid line? The stroke studio can quickly do that for you!
Next to Style you can choose straight, dashed, or paintbrush. You can also choose different ends and starting points such as arrows in the same studio. This is great for adding grainlines onto patterns.
Layers
Probably one of the most used studios when you are sewing, the layers panel!
To turn off or on several layers, click on one layer, then hold shift and click on another. All the layers in between will be selected. Then you can toggle the visibility on or off for all those layers.
This is a great way to deselect all of the layers that you don’t need and just leave your size visible.
You can also change the opacity of one layer as needed by selecting the layer and then changing the opacity at the top of the layers studio.
You can click and drag any layer and nest them inside another layer.
Transform
The transform studio is a very useful tool that you will want to familiarize yourself with. My favorite feature of the transform studio is being able to rotate a pattern piece at any amount that I want. I can get the perfect bias cut by rotating pieces 45 degrees. Rotating an object exactly 90 degrees is also easy to achieve.
Next to the “R:” in the transform studio type in any degree of rotation that you would like.
The X and Y axis are great transforming tools as well! Click next to the number and type + or – 1. Under the X, the pattern piece selected will move to the right 1 inch (or the units you have selected) when you add and the left 1 inch when you subtract.
The Y axis will move the object up or down.
The W and H stand for width and height. These are great for drawing rectangles with a specific width and height.
History
Have you ever made a mistake a few steps ago and wished you could go back to where you started? Well, the History panel does just that!
It records all the edits and actions you have made while the document has been open in the current session.
Just click on the action that you want to go back to, then work from there.
Navigation
Are you working zoomed in on a pattern, but want to go to a specific point on the pattern? Do you want to save your calibration zoom so you can jump back to it at any point? Then, the navigation panel should be your friend!
By clicking on the picture in the Navigator panel, the artboard will jump to that point. You can also type in any zoom percent and the document will be zoomed in.
To save a zoom or viewpoint, click on the three lines in the top right corner. Select “Save current Viewpoint”. Once the viewpoint is saved, you can zoom in and out on the document then click back on the saved viewpoint to go back to the zoom you saved.
Rename the viewpoint by clicking on the viewpoint you saved, then clicking on the three lines in the top right corner. Select “Rename selected viewpoint”. Name it anything you’d like!
Conclusion
Now you know how to get started using Affinity Designer 2 for Sewing! I guided you through opening patterns, using various tools, and understanding the studios.
There is still more to learn, but with these basics, you are ready to jump in! Keep practicing your skills and you will get better and better!
Give some of these tutorials a try: Pattern Tetris, adding seam allowance, calibrating in Affinity Designer, and much more!


