Last updated on July 18th, 2023 at 09:34 am
*This post may contain affiliate links and we may earn a small commission if you click on them.
Have you ever wanted to make lines and text more visible in Adobe? One way to do this is by learning how to invert colors in Adobe.

This is a great tool to have in your pocket when sewing with a projector!
Some materials make it difficult to see even the thickest, darkest black lines. Inverting the colors in Adobe is a quick workaround to increase visibility!
This will often change the text and background color of a pattern, but rarely changes the actual pattern lines.
You can change the colors and thickness of pattern lines using PDF Stitcher. This PDF Stitcher tutorial will walk you through how to do that!
Often a quick invert of colors in Adobe will be just the trick you need! Just a few clicks will invert the colors right in Adobe Acrobat reader!
Step 1: Preferences
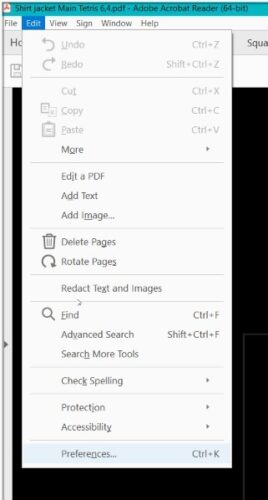
Have your pattern open in Adobe Acrobat Reader. Press the shortcut key CTRL+K. This will open the Preference menu.
To open without the shortcut go to the “Edit” menu in the older version of Adobe or the main menu in the newer version of Adobe.
Then scroll down to where it says “Preferences”.

Step 2: Replace Document Colors

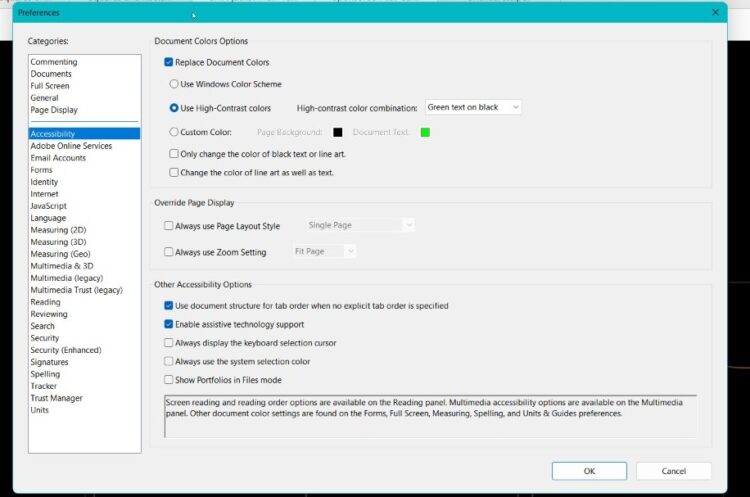
In the Preferences menu, click on “Accessibility”. Once you’ve clicked on that, you will see a box next to “Replace Document Colors”. Check the Box.
Step 3: Use High Contrast Colors
In the same box, select “Use High Contrast Colors”. This will have default colors selected. There are four different selections available. You can choose the green text on black, yellow text on black, white text on black, or black text on white.
Step 4: (Optional) Choose Custom Colors
If the presets don’t work well for the fabric you are using, you can choose any color you want using “Choose Custom Colors”.
Underneath the custom colors, you will see boxes for “only change the color of black text or line art” and “change the color of line art as well as the text”.
Depending on how the pattern is structured, these may change how the pattern is shaded. You can toggle these on and off to see how it changes the look of the pattern.
Usually selecting “Change the color of line art as well as the text” works well.
Side Notes
Sometimes you will see a box pop up that says “Content Preparation in Progress”. This is just Adobe working to create the changes!
Because of the way some patterns are created, they may not change the colors of the pattern lines. In these cases, you would need to use PDF Stitcher, Inkscape, or Affinity Designer to change the line colors.
Hope this tutorial created another tool for your projector sewing toolbox! Don’t forget to share and mention this tutorial!
Now you can master how to invert colors in Adobe Acrobat Reader!
Happy Sewing!
You might also be interested in these other Adobe Tutorials!


