Last updated on July 17th, 2023 at 09:19 am
*This post may contain affiliate links and we may earn a small commission if you click on them.
Don’t get caught cutting fabric without using your calibration zoom! Learn how to set default zoom in Adobe!
Projection sewists know how important the correct zoom is in Adobe. Are you tired of typing your calibration zoom every time you open Adobe?
This simple trick will open every pattern at the same zoom. Once it is set with your calibration zoom percent, you are ready to go!
*I always recommend checking your zoom before cutting! A quick way to do this is by going to full-screen mode (CTRL + L) and then pressing CTRL/Cmd + Y. The zoom window will pop up.
Open a pattern in Adobe and follow the steps below!
Step 1: Edit > Preferences
In Adobe go to the menu and click on Edit. Click on preferences at the very bottom.
*In the new Adobe update just click on the “Menu” hamburger menu. You can also used the shortcut CTRL+K to access the Preferences menu.
Step 2: Page Display
From the left menu, select “Page Display”.
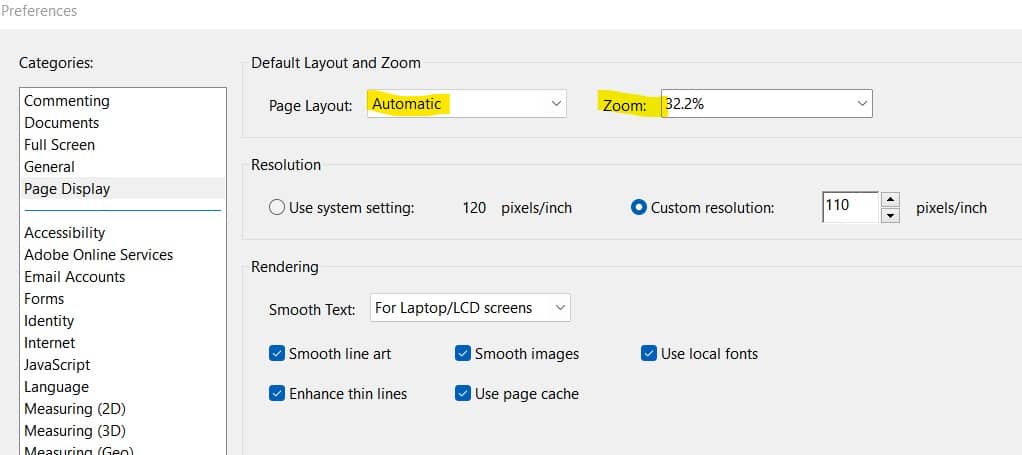
Step 3: Automatic and Zoom
Set the drop-down menu next to Page Layout to “Automatic”. Next to zoom type in the percent, you got during projector calibration.
Step 4: See it work!
Close Adobe, then go back to a pattern and re-open it. It should automatically open the document at your set zoom percentage! And now you know how to set default zoom in Adobe!
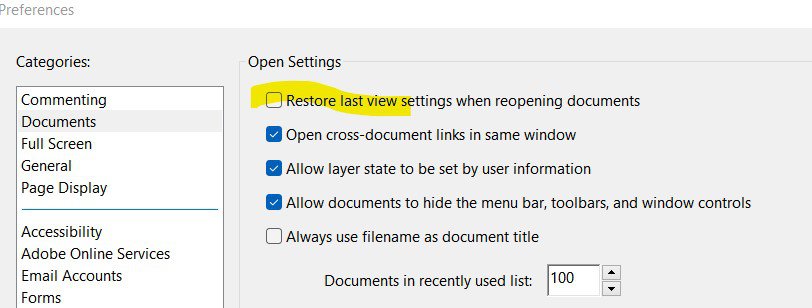
Step 5: Don’t Restore Last Zoom (optional)
In the default settings, Adobe will restore a document to the last zoom percent it was at when closed. As an optional step, you can turn this off to ensure that patterns and documents are always opened to the calibration zoom.
This is especially helpful if you have a tendency to start cutting without checking your zoom. You’re not guilty of every doing that, right? Haha, me neither.
Anywho…..This is how to turn this option off.
Go to Edit>Preferences>Documents and uncheck “Restore last view settings when opening a document”. If you did everything else above, your documents will always open up to the calibration zoom that you set!
Full Screen Zoom Mode
Full screen is the place you want to be when cutting patterns out! However, it can get frustrating to have zoom change every time you go full screen.
While you are looking at preferences, change what happens when you go full screen mode!
Open Edit>Preferences>Full screen. Uncheck “Fill Screen with on page at a time”. Press “Okay” at the bottom to save.
Now use the magic buttons (CTRL/Cmd +L) to go full screen. Use CTRL/Cmd + Y to check your zoom percent.
Tada! It remained your calibration zoom that you set.
*If you enjoyed the article, consider supporting me by joining my newsletter or purchasing something through my affiliate links. Thank you!
How cool is that! Want to learn another cool trick? Check out How to Invert Colors in Adobe to make lines more visible!
Make sure to check out these other Adobe Tips or check out the articles below!
