Last updated on September 28th, 2022 at 12:58 pm
*This post may contain affiliate links and we may earn a small commission if you click on them.
Have you ever wanted to make simple pattern adjustments using your projector? Let me show you a simple way to do that using the tools we learned about in Digital Annotations Part 1. We will be using the comment tools to make pattern adjustments right on your projector file.
I’ve also included another fun FREEBIE for you today! This is an Adobe Reader shortcut cheat sheet! You will get all the great shortcuts you need when using Adobe for pattern projecting. If you are new, be sure to take a look at the Intro to Adobe for great tips on getting started with pattern projecting.
*This post may contain affiliate links.
Do you enjoy running? I have two brothers that are really into marathon running. They have both qualified for the Boston Marathon a couple of times. One of them is even into ultramarathons. I’m not sure why anyone wants to run for 100K! But, if you like it, go for it!
In highschool, I was a sprinter on the track and field team. I never really did run long distances. I just don’t find joy in running long distances.
Today you probably won’t find me running unless I’m chasing a kid! But, whether you like to run marathons, or just enjoy living in comfortable pants, you NEED a good pair of joggers.
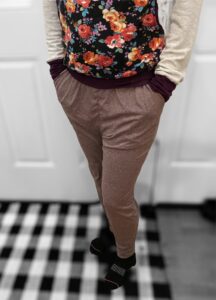
I sewed up some joggers recently using my projector. The best part is that I made all of my height adjustments digitally on the pattern using Adobe and the projected image. No need to learn new programs like Inkscape, Affinity Designer, or Illustrator to make these adjustments!
Once you make all of the adjustments you can save your changes right to your computer, or Google Drive! Next time, just pull up the pattern you already adjusted to sew another pair!
The pattern I will be using today is the Straight Fit Joggers from Ellie and Mac. They have great instructions included in the pattern with videos on how to adjust it to fit you! They give you a specific formula on how many inches to take out and where! It really was the simplest height adjustment to make and took out all of the guess work! These joggers are so comfortable, I could live in them!
If you don’t have a pattern with specific instructions on making height adjustment, or aren’t familiar with how to make height adjustments, I suggest watching a video on how to make height adjustments to sewing patterns.
*Note: You cannot access the comment tools in full screen mode. But, once your pattern is digitally adjusted, go full screen! Don’t forget your cheat sheet for full screen mode at the bottom of this screen.
How to Make Digital Pattern Adjustments for Height
Adding and subtracting height from a pattern digitally is very easy to achieve. I will go over the steps using the method that I found the easiest and quickest way to make pattern adjustments using a projector.
The idea takes exactly what you would normally do on paper patterns and transfers them to digital methods. With paper patterns, you typically cut on a horizontal line and add paper in between the lines to add height. To take height away, you cut on the horizontal line and overlap the paper.
In digital patterns, you will be moving the pattern image up (or left) and down (or right) to add and subtract length from the pattern.
*Note: This method can also be used in Xodo to make pattern adjustments! The exact tools you use will be a little different!
Example of Adding/Subtracting Height Digitally
1. Open your pattern in Adobe and select the size in the layers that you need. Before making height adjustments, complete any other grading that needs to be done. I use the comment tools (straight line and connected dots polygon) to draw grading lines.
2. Now, identify the height adjustment line on the pattern, or determine where you are going to make your height adjustment. This may be in one spot, or several. On the jogger pattern, I spread out the height adjustments in three places. Good patterns will indicate the best places to add and remove height. Sometimes it is best to make a muslin to see how it fits on YOUR body.
3. Make your calculations. Determine how much height needs to be removed or added. This is usually spread out throughout the pattern. I needed to remove ¾ inches from the joggers because it was drafted for 5’10” and I am shorter than that. The Ellie and Mac Joggers instruction say to take ¾” away at the first line if you are shorter than 5’10”. The other amounts where determined using a formula given in the pattern.
4. Now it is time to digitally adjust your pattern piece! Since I am drawing a straight-line adjustment, I chose to use the square polygon tool in the comment menu.
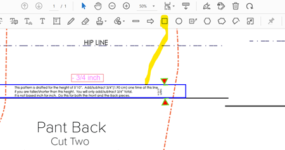
5. My favorite way to measure the height of the rectangle is to project the pattern (using the correct calibration zoom) and use a ruler on the projected image. Then, I can draw a rectangle using my mouse, looking at the projection. Just like if you were drawing with a pencil and paper! You can also do this right on your computer using measure tools in Adobe, but I find it tedious. If your pattern has a calibration grid, it is a little easier to do! Try it out to see if you like it!
6. Use the text box tool to make a note whether you are adding or subtracting height and how much.
7. Repeat this process for all the areas that need height added or subtracted. I like to color code the border of the boxes: blue for adding height and red for subtracting! Click on the color circle to select a color. Click Fill> no color, then choose the Border tab > (color of your choice).
8. Do any other digital notes at this time too. I use the stamp tool to note cutting instructions for each piece. They are free in Digital Annotations Part 1 if you missed it! Don’t forget to press Cntrl (or Cmd) + S to save your digital file with notes to use over and over again!
9. Once all of your digital notes have been made you are ready to cut! Before you begin, make sure to place your pattern on your fabric in a way that will give you room for the height adjustments you are making. If you are adding height, make sure you have the spare inches that you need on the fabric before starting to cut. You don’t want to run out of fabric while you are cutting!
10. Go to full screen by pressing Control (Windows) or Command (Mac) L. Next type in your calibration zoom by pressing Control/ Command Y. My calibration zoom is 33.7%, but remember everyone has a unique number!
11. To add height, you will cut from the top of your pattern down to the second line of your rectangle. I place my ruler at the end of my cut, lined up on the rectangle line I cut to. If this is your first time, feel free to draw the pattern using tailors chalk, Frixion pen, or washable marker.
12. Then, use the arrow keys (or slider) to shift the pattern image until the top line of the rectangle lines up with your ruler. Make sure the sides of your pattern still line up!
13. You may need to blend the lines as you go.
14. To subtract height, cut from the top of the pattern image to the first line of your rectangle. Put your straight edge (ruler) down on the line. Shift the pattern image until the bottom line of the rectangle lines up with your ruler.
15. Blend lines and continue cutting the rest of your pattern.
*Note: If you need to make a curved line adjustment, first trace the pattern line you will be adjusting using the connected lines polygon tool. Then use a ruler or pattern calibration grid to move the line you drew.
Pattern Adjustments Using a Projector in Action
Whew! That seems like a lot, but it really isn’t. Here’s a video to show you pattern adjustments using a projector in action! You also deserve a reward! Keep scrolling to find your Adobe Acrobat shortcut cheat sheet!
Now for the freebie you have been waiting for! Do you ever find yourself needing to navigate your pattern or inverse colors when you are already in full screen mode? You know there is a shortcut for what you need to do, but can never remember? Then, you need the projector sewing Adobe cheat sheet as much as I do!
I printed it off and put it where I can see it when projecting patterns. Makes it so easy to get done what I need to quickly. Click the link below to sign up for my newsletter and get the free Adobe shortcut cheat sheet.
What to learn next?
Looking to advance your projector sewing knowledge? I recommend learning to use the PDF Stitcher program. With PDF stitcher, you can digitally “tape” together letter/A4 sized print-at-home PDF patterns. You can also change A0 or Projector files to add larger margins or make the lines thicker! Take a look at my PDF Stitcher Tutorial!


