Last updated on December 5th, 2023 at 10:50 am
*This post may contain affiliate links and we may earn a small commission if you click on them.
Are you looking for a program that will allow you to plan your pattern layouts, make pattern alterations, and project sewing patterns? PLUS, do all of these for FREE! Then, you’ve come to the right place! This is the total beginner’s guide to using Inkscape for sewing with a projector.
Even if you don’t have a projector yet, you can start delving into Inkscape for sewing!
In this Inkscape tutorial for sewing, I will go over:
- How to Download and Open a Pattern
- Tour the Interface and Preferences
- Calibration Zoom and Rotation
For other Inkscape tutorials for sewing, make sure to check out my Inkscape tutorials page!
Table of Contents
Need Visual Guidance? Watch these Inkscape Videos
What is Inkscape and Why Use Inkscape for Sewing?
Inkscape, a versatile vector graphics editor, stands as a powerful tool in the arsenal of creative individuals and professionals alike. Inkscape empowers users to craft stunning visuals, scalable artwork, precise designs, and now work with sewing patterns. 😊
Inkscape is a free and open source program making it an affordable vector graphics editor for many different applications!
Since sewing patterns are vector graphics at their core, a vector graphics program is especially what we need for digital alterations.
Key Features and Functionalities of Inkscape
- Drawing and Shape Creation: Inkscape provides an extensive toolkit for creating intricate shapes, lines, and curves. Users can draw freehand, manipulate shapes, and combine them to construct intricate designs. This feature is useful for creating your own simple pattern pieces, but otherwise not used a lot of sewing pattern alteration.
- Text Handling: The program supports versatile text handling, allowing users to apply various fonts, styles, and effects to their textual content. This makes it ideal for creating typography-rich designs, posters, and even comic book lettering.
Again, this a wonderful feature for designers, but not extensively used in sewing pattern alteration for projector sewing. Simple text for labeling pattern pieces is what we use this feature for!
- Illustration and Artwork: Inkscape is a favorite among illustrators for its ability to facilitate the creation of detailed artworks. Its use of layers allows artists to work on different elements separately, simplifying the creative process. Layer, especially with the 1.3 Inkscape updates, is very useful when using layered sewing patterns.
- Node Editing: The node editing tool lets users fine-tune shapes and paths with precision. This feature is particularly useful for refining intricate details in logos and illustrations. It is by far, one of the tools and features used most for digital pattern alterations!
- File Compatibility: Inkscape’s native format is SVG (Scalable Vector Graphics), an open standard widely supported by various software. Additionally, it can import and export various file formats, promoting seamless collaboration with other design tools. The most common form for digital sewing patterns is PDF.
Real-World Applications
- Logo Design: Inkscape is a popular choice for crafting professional logos. Its vector capabilities ensure that logos remain crisp and clear across different sizes and mediums.
- Web Graphics: Designing icons, buttons, and banners for websites is made easy by Inkscape’s ability to create scalable graphics optimized for the web.
- Print Materials: The program’s precision and scalability make it ideal for designing print materials such as brochures, flyers, and business cards.
- Digital Art: Inkscape’s versatile tools cater to digital artists, enabling them to create intricate illustrations, character designs, and digital paintings.
- Digital Sewing Pattern Alteration: Now, many are finding this program suitable for making digital pattern alterations and projecting sewing patterns.
Because it is free to download and use, it is a great way to get into digital pattern alterations. If you are ready to go completely paperless in your sewing, then it’s time to combine the power of a projector with a vector graphics program!
Other popular options are Affinity Designer and Adobe Illustrator.
Part 1: How to Download and Open a Pattern in Inkscape
Let’s start off by downloading Inkscape onto your computer. I have included two sets of instructions and a video. Choose either the Windows or Mac version. If you are on GNU/Linux, make sure to download the compatible program.
How to Download Inkscape for Sewing on a Windows Computer
Step 1: Visit the Inkscape Website
Open your preferred web browser and navigate to the official Inkscape website: https://inkscape.org/.
Step 2: Access the Download Page
On the Inkscape homepage, you’ll find a prominent “Download” button. Click on it to be directed to the download page.
Step 3: Choose Your Version (32-bit or 64-bit)
On the download page, you’ll see different versions of Inkscape available for various operating systems. Locate the Windows version that matches your system architecture (32-bit or 64-bit).
If you do not know what your system architecture is, this is how you can find out:
How to Identify System Architecture on Windows
Follow these steps to identify whether your system is 32-bit or 64-bit:
Method 1: Using System Information
- Open the Run Dialog:
- Press Win + R on your keyboard. The “Run” dialog box will appear.
- Enter “msinfo32”:
- Type “msinfo32” into the Run dialog box and press “Enter” or click “OK.”
- View System Information:
- The “System Information” window will open, displaying detailed information about your computer.
- Check System Type:
- In the left pane, under “System Summary,” select “Components” and then click on “System.”
- Look for the “System Type” entry in the right pane. It will indicate whether your system is “x64-based PC” (64-bit) or “x86-based PC” (32-bit).
Method 2: Using System Properties
- Open System Properties:
- Right-click on the “This PC” or “Computer” icon on your desktop or in File Explorer and select “Properties.”
- View System Information:
- In the “System” window that appears, under “System type,” you’ll find the information about your system architecture. It will be either “64-bit Operating System” or “32-bit Operating System.”
Step 4: Start the Download
Clicking on the link will initiate the download of the Inkscape installer executable (.exe) file. The download process might take a few moments, depending on your internet connection speed.
Step 5: Run the Installer
Once the download is complete, navigate to the location where the installer file was saved (usually the “Downloads” folder). Double-click the installer file (it will have a name like “inkscape-<version>-x64.exe” for 64-bit systems) to start the installation process.
Step 6: Choose Installation Options
The installer will launch, presenting you with various installation options. You can choose whether to install the application for all users on the computer or just for your user account. You can also select the destination folder where Inkscape will be installed. After making your selections, click the “Next” or “Install” button. I recommend just using the default.
Step 7: Complete the Installation
Once the installation is complete, you’ll see a “Finish” button. Click on it to close the installer.
Step 8: Launch Inkscape
Inkscape is now installed on your Windows computer. You can launch it by either finding the desktop shortcut icon (if you allowed the installer to create one) or searching for “Inkscape” in the Start menu.
Congratulations! You’ve successfully downloaded and installed Inkscape on your Windows computer.
How to Download and Install Inkscape on a MAC
Step 1: Visit the Inkscape Website
Open your web browser and go to the official Inkscape website: https://inkscape.org/.
Step 2: Access the Download Page
On the Inkscape homepage, you’ll see a noticeable “Download” button. Click on it to be taken to the download page.
Step 3: Choose Your Version
Sometimes you will be redirected to the best download for your system. If so, then just click download!
Otherwise, you will see available options for download. These include the Intel architecture or the arm64 (M1 chip architecture).
Choose the one based on your computer architecture. If you are not sure, this can be found in System Information.
Step 4: Start the Download
Clicking on the mirror link will start the download of the Inkscape disk image (.dmg) file. The download time will vary depending on your internet speed.
Step 5: Open the Downloaded File
Once the download is complete, you should see the downloaded .dmg file in your designated download location. Double-click on the .dmg file to open the install file.
Step 6: Install Inkscape
Inside the install folder, you’ll see the Inkscape application icon and a shortcut to the Applications folder. Simply drag the Inkscape icon onto the Applications shortcut. This will copy Inkscape to your Applications folder and install it.
Step 7: Launch Inkscape
Navigate to your Applications folder (you can do this by clicking on the Finder icon in your dock and then selecting “Applications” from the sidebar). Find the Inkscape icon and double-click on it to launch the application.
Step 8: Explore Inkscape
Congratulations! Inkscape is now installed on your Mac.
Part 2 Getting to Know Inkscape’s Interface
Inkscape is a powerful vector graphics editor with a user-friendly interface. Understanding its interface is crucial for ease of use when using Inkscape for sewing with a projector. Let’s explore the key elements of Inkscape’s interface:
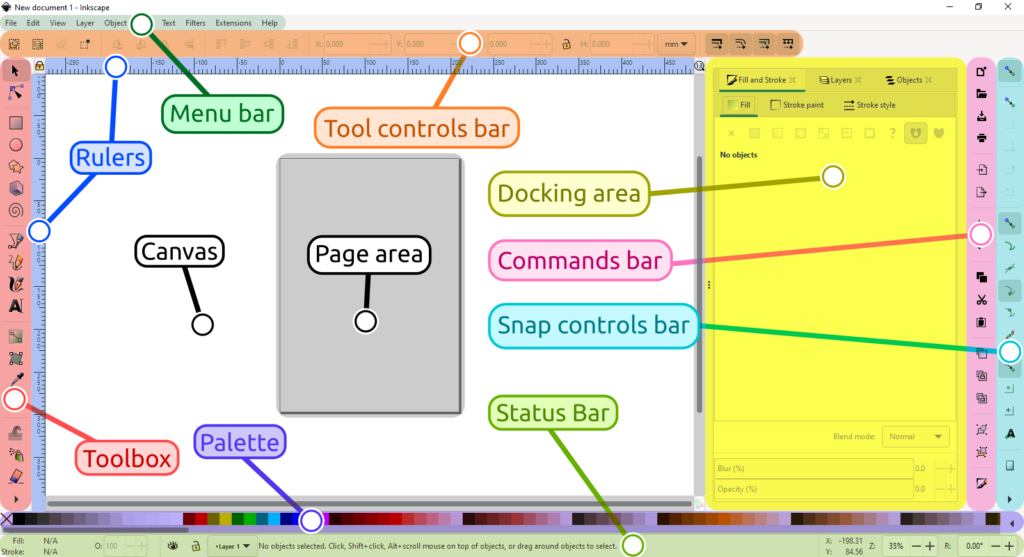
- Application Menu Bar
The application menu bar, located along the top of the window, provides general menu options. Some of these options are familiar, such as “File → Save” and “Edit → Copy,” while others are specific to Inkscape. Such as layers, objects, text, and extensions.
- Tool Controls Bar
Just below the application menu bar, the tool controls bar adjusts based on the currently selected tool. It displays the options for the active tool, making it easy to customize your actions.
- Toolbox on the Left
On the left side of the interface, you’ll find the toolbox, which contains the main drawing tools. Keep in mind that only one tool can be selected at a time. You can also customize which tools appear and how large the icons are in “preferences”.
- Canvas Area
The large blank area at the center of the window is the canvas. This is where you’ll create and edit your images. A black outline represents the visible page area.
- Right-Side Toolbars
To the right of the canvas, there are two toolbars:
- Commands Bar
The commands bar provides quick access to common commands. You can access these commands through dropdown menus as well. If not all commands are visible, look for a right-facing arrow to access hidden options.
- Snap Controls Bar
The snap controls bar is located to the right of the window. It’s advisable to deactivate snapping when not needed, which can be done by pressing the topmost button in the bar or using a shortcut.
- Rulers and Scrollbars
Inkscape offers useful tools for navigation and precision:
- Rulers: Rulers are available at the top and left of the canvas, aiding in grid and guideline placement.
- Scrollbars: Scrollbars on the right and bottom of the canvas allow you to navigate within your artwork.
- Color Palette
The color palette, positioned near the bottom of the window, is primarily used to change the fill color of objects. For more information, refer to “The Color Palette.”
- Status Bar
At the very bottom of the interface, you’ll find the status bar. It provides essential information, including:
- Colors of the selected object
- Layers
- Cursor coordinates
- Zoom level (Hint: we don’t use this to find the calibration zoom!)
- Page rotation (more on using this later!)
Additionally, the status bar can display helpful texts, such as the number and type of selected objects, keyboard shortcuts, and usage hints. It’s a valuable resource when Inkscape behaves differently than expected.
- Docked Dialogs
Specific functionality in Inkscape is accessed through dialogs that, by default, appear attached to the right of the canvas in the docking area.
Understanding Inkscape’s interface layout is the first step to mastering this versatile vector graphics editor. Once you learn the basics in this beginner’s guide to Inkscape for Sewing, you’ll be ready to follow along with more advanced tutorials.
Part 3: How to Calibrate Your Sewing Projector in Inkscape!
Have you already calibrated your projector for sewing using another program such as Adobe? Then, calibrating in Inkscape is going to be a breeze!
If this is your first time calibrating a projector for sewing, I suggest checking out this article on calibrating a projector for sewing.
I will not be reviewing how to physically adjust the projector and keystones for calibration. These steps will conclude that your projector is already square and level to the cutting surface.
Do NOT use the zoom level control on the status bar for calibrating. Using the preferences and setting a 100% actual size zoom will ensure that 100% is an accurate scale for cutting patterns out and using Inkscape for sewing.
Step 1: Open Preferences
To access preferences, go to Edit>Preferences. Go to the section titled “Interface”
Step 2: Enlarge the Preferences Window
To get the most accurate scaling, you will want this window to be as wide as possible on your screen. Hover your mouse over the right side of the window and a double arrow should appear. Click and drag until the window is as wide as your computer screen.
Step 3: Check units
Make sure you are calibrating in the units of measurement that you will be working in. I use inches, so I selected the “in”. Under “zoom correction factor” look to the far right under the number box. There is a dropdown menu to choose/change the units of measurements.
Step 4: Find the Actual Size of Projected Image Using a Ruler
Now, you will use the ruler under the “Zoom Correction Factor” to set the size of your projected image.
You will need a ruler. I used my clear quilting ruler and it worked great!
With the on-screen zoom correction factor open, project the Inkscape screen from your sewing projector. Use the slider on the zoom correction factor or type in numbers to the nearest hundredth to change the size of the on-screen ruler.
Change the ruler size until it matches the actual size of the real-life quilting ruler.
Step 5: Check Using Calibration Tool
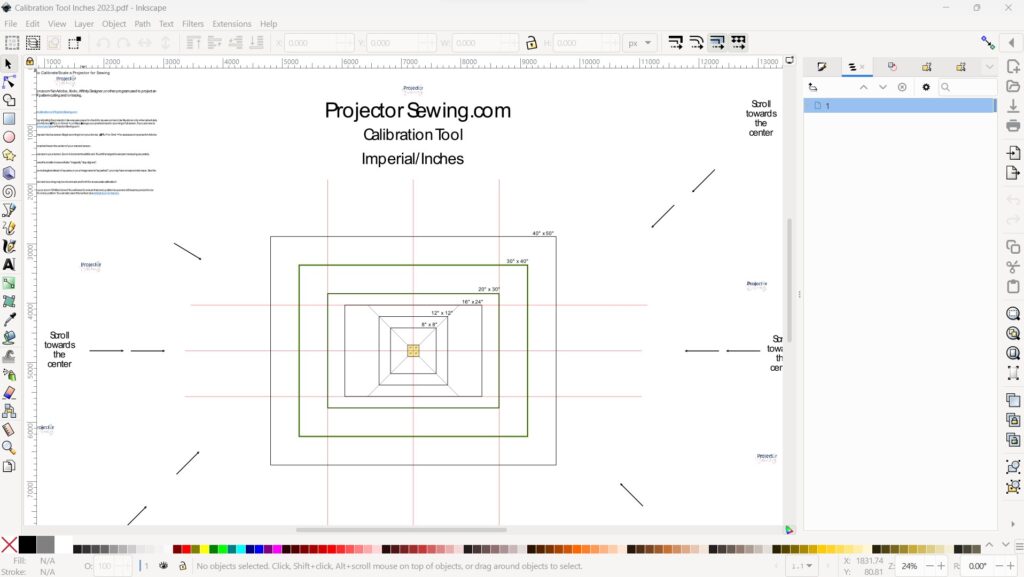
You are almost finished! Now close the preferences window and open the calibration tool.
You can download one HERE:
Using the calibration tool check the accuracy of the zoom. Put the zoom level to 100% and check that the calibration tool on the projected image lines up correctly. If not, fine-tune the zoom correction factor by going back to the preferences menu.
If everything lines up you are calibrated in Inkscape!
Step 6: Shortcuts for Zoom
To jump to your calibration zoom in Inkscape you can:
-Type 100 in the zoom level on the status bar
-Press the number “1” as a shortcut for 100% zoom
-Go to View>Zoom>Zoom 1:1
Your 100% zoom will now be the correct calibration zoom for every PDF sewing pattern that you open! Now the possibilities are endless for using Inkscape for sewing!
*Remember to always check your calibration squares or layers that come with a pattern for a quick check before sewing.
Conclusion
Whew! We covered a lot today in this total beginner’s guide to Inkscape for sewing! Give yourself a pat on the back and congratulations!
You are on your way to becoming an expert on using Inkscape for sewing! You are ready to start exploring other tutorials on Inkscape.
You can also checkout Marta’s Inkscape for Sewing channel on YouTube @techiesewing. She did a lot to help the developers for Inkscape make it better for sewing purposes! She has a lot of tutorials on making pattern adjustments in Inkscape. Give her a like and subscribe!


Hi there, thank you so much for the tutorials. I find them helpful. I have access to Adobe Illustrator, but in all the reading I have done people say it is cumbersome to learn. I don’t know if that is true. I have noticed that several people have a few tutorials on INKSCAPE, but not nearly to the depth of Affinity. I would like not to have to spend the money on this program, but is it worth it? Do you use one over the other for your normal sewing? Most of the time I need to adjust the length as I am taller than what the patterns were drafted for. I usually am in between sizes as well. My question is can you make these alterations at one time in INKSCAPE or in Affinity or for that matter Adobe? I didn’t see a tutorial on grading or adjusting length in INKSCAPE. The only one I have seen is done in two different steps. Also, the tutorials are 3 years old prior to the new version of INKSCAPE and Project and Cut and Pattern Projector. Would these programs also make a difference in how you might make adjustments since they project in the proper calibration? I would be very interested in your thoughts on all this. I am excited to get started.
Hello!
Sorry it has taken a bit to get back to you. If you already have Adobe Illustrator, I’d go with that! Start learning the basic tools including the pen and node tool. Most of the tutorials are for Inkscape and Affinity Designer because they are free and low cost, compared to Adobe Illustrator. One of these programs (any vector graphics program will work) can modify the length of PDF patterns and you can save it for future use. You will need to lengthen each pattern individually, but you can save them to use again and again. Choose one program to learn. If you have Adobe Illustrator, than use that. If not, you can start with the free Inkscape.
The calibration programs PatternProjector.com and Project and Cut do not make pattern modifications and are for viewing patterns.