Last updated on January 6th, 2023 at 08:59 pm
*This post may contain affiliate links and we may earn a small commission if you click on them.
Have you ever wanted to draw a mockup of a sewing pattern before sewing it? Learning how to make sewing mockups in Inkscape will let you do that!
Many programs can be used to create mockups. But, since I already use Inkscape to grade patterns and unfold pieces, why not use a program I already have?!
This is one instance that I prefer using Inkscape over Affinity Designer! The reason is that Inkscape has a “trace bitmap” feature, while Affinity Designer does not. Tracing a line drawing is quicker in Inkscape for this reason.
Sewing mockups are great to create for personal use, but can also be shown to clients as an illustration of what the final product will look like with certain material and color choices.
Let’s get started learning how to make sewing mockups in Inkscape!
Step 1: Copy and Paste Line Drawing into Inkscape
To create a mockup you will need a pattern that has a line drawing. This is often found in the pattern instructions and is usually shown in preview pictures before buying a pattern. However, you should note that not all pattern designers provide line drawings, so choose wisely!
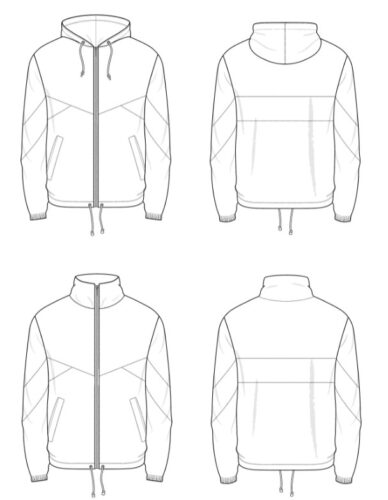
Open a blank artboard in Inkscape. You can use “document properties” to create any size canvas you would like for the mockup. If you are sending these to a client, I suggest keeping it simple and doing letter sized.
First, you will need to copy and paste the line drawing from the pattern or online preview into Inkscape.
I do this by taking a screenshot using the “snipping tool” in Windows. With the snipping tool open, press “New” and drag a rectangle over the line drawing. When you release the mouse a preview of the image will appear. On the top right-hand side, press “copy”. Open Inkscape, click on the document, and press CTRL+V to paste.
For Mac, press Command+Shift+4. When the crosshairs appear, click and drag your mouse to select the image. Release the mouse and the image will be taken. The default place where Mac saves a screenshot is on the desktop. Select the image and press Command+C to copy. Open Inkscape, click on the document, and press Command+V to paste.
This is a good time to adjust the image to the size you want using the “select tool” in Inkscape.
Step 2: Trace Image
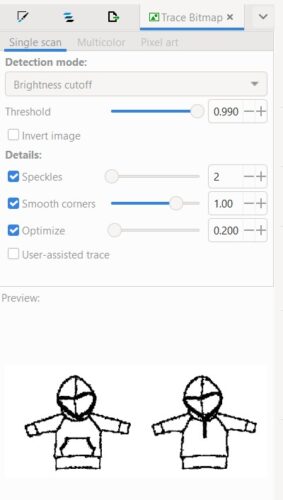
Next, you will need to trace the image in Inkscape (or any vector graphics program). Select the image and go to PATH>Trace Bitmap.
On the right panel, a tab titled “Trace Bitmap” will appear. Next to “Threshold”, you will see a slider. Increase the threshold until the entire line drawing is traces and the lines are dark. But, don’t go so far that you start getting “noise” on the image. Usually, around 0.7 or 0.8 is good, but it varies per pattern.
The example below is from the free Hoodie pattern by Lowland Kids.
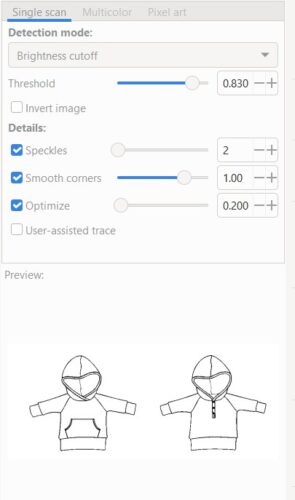
Step 3: Create Sections in Image
Separate the tracing from the original image. The original image is usually the first image you select when you click on it. Drag it down.
Click on the tracing and go to PATH>Break apart.
If you selected the right image, the entire tracing will turn black.
If it doesn’t, go back and try again selecting the other image. Once you know for sure which is the original image and which is the tracing, you can delete the original image. You won’t need it anymore!
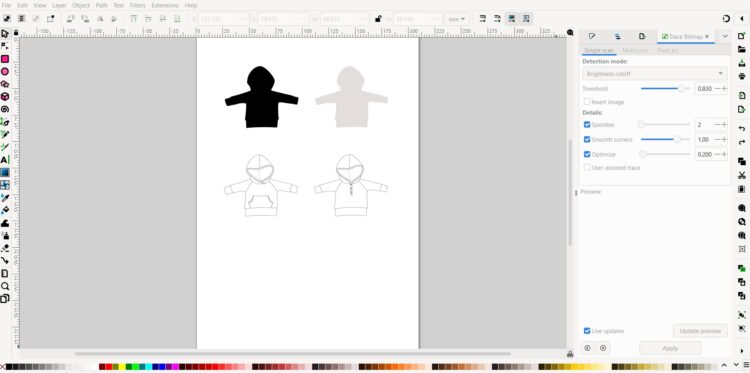
Step 4: Separate Sections
Now, to make it easy to see the different sections, we will create a fill of the tracing.
Deselect the image by clicking anywhere on the canvas. Then, select one image, and select a new lighter color from the colors at the bottom of the screen. On the top menu, there is a button called “lower section to bottom end”. Click that and your traced image will appear clearly.
*Repeat with any other traced images. Then duplicate as many as you need to work with.
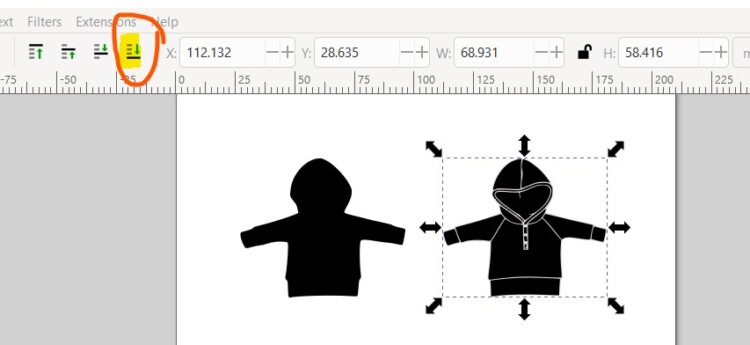
Step 5: Select Sections and Fill with Solid Color
Now you can select individual parts of the pattern to design. If you are filling with a solid color, it is as easy as selecting the area and choosing a color from the bottom.
If you want to use a specific printed pattern, then continue following the steps.
Step 6: Import a Picture of the Fabric
To fill with a pattern you will need a picture of the fabric you plan to use. This can be a picture you take of the fabric you have. Or you can take a screenshot of the fabric online.
Import the picture into Inkscape. Copy and paste again works just fine.
Step 7 (Optional): Create a Pattern and Resize
This is an optional step, but I like to do it. You can skip this step if you don’t want to scale your pattern to size.
To scale the pattern size, you will need to convert the image to a pattern.
Select the image of the fabric then go to Object>Pattern>Objects to Patterns.
Then, using the Node tool, select the pattern and scale it down. It is a little bit of guesswork to get it just right!
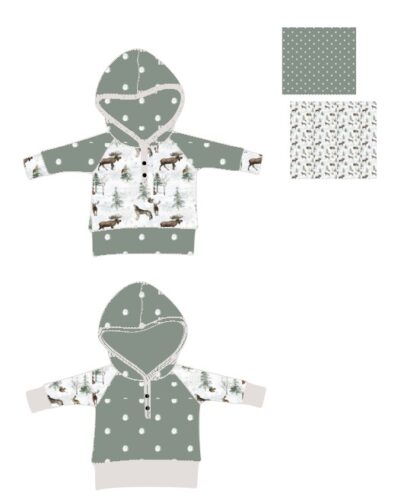
Step 8: Select Pattern Piece
Now use shift and click on all the pattern pieces that you want to be used for that fabric. (Remember CTRL+Z for undo.)
Join these pieces together by going to PATH>Union. They should all be “one piece” now.
Step 9: Create a Fabric Cut-Out
Now you will use these pieces to create a cut-out of the fabric. Move the joined pieces over your scaled fabric image.
They may disappear under the fabric. Just use the menu to raise them to the top layer.
Select both the pattern and fabric, then go to OBJECT>Clip>Set clip. The fabric image will disappear and be replaced by the clothing cutouts.
Select the clothing and move them back into place.
*Repeat until you have all the pieces how you want them to look.
You can even do this with panel images!
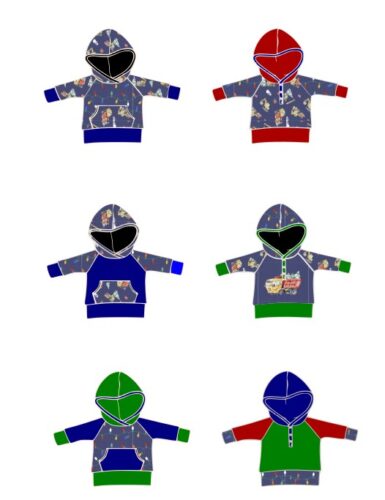
Step 10: Cleanup and Admire
Go through the mockups and adjust the colors how you want. You can change the background or line colors as well by selecting that layer and choosing a color at the bottom of the screen.
You can save these by taking another screenshot or save as a PDF. To save as a PDF from Inkscape, go to File>Save As. Make sure to choose PDF as the file type and name the file anything you want.
Now that you know how to make sewing mockups in Inkscape, you never need to wonder how two fabric combinations will look together!
Make sure to check out other Inkscape tutorials on the Tutorials page!

Inkscape Master Class
Are you ready to master Inkscape? Stop searching and start learning! This Logos By Nick Inkscape Master class comes highly recommended!
“This is what I used to learn Inkscape! Although it is not sewing specific, I found it so helpful for getting started!” -Sheredith
This course includes 50+ videos that walk you through the tools and how to use it to do just what you want.


